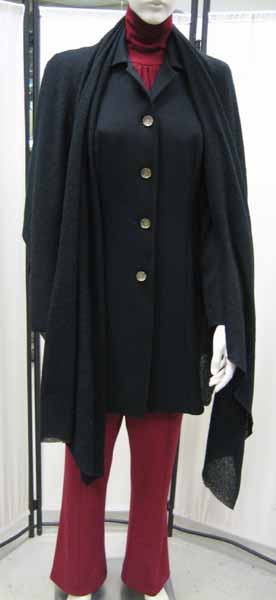
Making the Double Collar Princess Jacket Using Black Double Knit or Ponte Knit
By Christine
I made the Double Collar Jacket using Double Knit fabric in 4.5 hours start to finish. The simplicity of the pattern and the qualities of the fabric made the construction a breeze. I find this a very versatile wardrobe piece.
Jacket Part One: Overview: http://www.cjpatterns.com/blog/2017/1/4/sew-a-knit-blazer-or-unlined-jacket-sew-along-part-one?rq=jacket
Jacket Part Two: Selecting fabrics & size: http://www.cjpatterns.com/blog/2017/1/14/sew-a-knit-blazer-or-unlined-jacket-sew-along-part-2?rq=jacket
Jacket Part Three: Cutting, Serging Darts: http://www.cjpatterns.com/blog/2017/1/27/serging-darts-in-knit-tops-and-jackets?rq=jacket
Jacket Part Four: Sewing & finishing http://www.cjpatterns.com/blog/2016/1/26/how-to-clean-finish-the-interior-of-an-unlined-jacket-or-coat?rq=jacket
Jacket Part Five: Buttons and buttonholes http://www.cjpatterns.com/blog/2017/2/10/how-to-choose-and-place-buttons-on-a-knit-blazer-or-jacket?rq=jacket
Jacket Part Six: Princess Jacket in Ponte http://www.cjpatterns.com/blog/2015/3/23/making-the-double-collar-princess-jacket-using-black-double-knit-or-ponte-knit?rq=jacket
Bonus:Jacket styles: http://www.cjpatterns.com/blog/2016/1/26/we-love-jackets-diy-a-perfect-blazer-sew-your-own-jackets-easily?rq=jacket
Typically, I would sew a size 12 for this jacket if I were making it in a woven fabric with no stretch. I wanted a snug (not tight) fit to access the qualities of the double knit, so I cut a size 10. The sizing was perfect!
The fabric is heavy enough, the stretch and recovery just right and the curvy-ness of the pattern enough, so that when I button jacket it hugs my curves in a very flattering way. Use the tissue pattern measurements/Perfect Sizing Worksheet to guide your sizing choice. I would make a quick sample jacket (front, back, sleeve) in a woven fabric then decide size for the double knit.
Sewing the jacket together…
I serged the forward shoulder seams, side seams, princess seams, center back and collar together.
I used my single needle machine for basting the collar to the neckline and for attaching the facings to the jacket, both around the neckline and the center fronts. The single needle machine gives me just a little more control at these key areas, and reduces any unwanted stretching/curving on the long center front seam. Stitch with the interfaced side up.
The serged seams pressed beautifully and quickly. Once pressed in place, I use my hands to set the press until the fabric cools a bit. I used a small ham for the bustline curve and the sleeve caps.
I added soft, covered Velcro shoulder pads just to square off the shoulder line.
I tried on the jacket after pressing and turned up the sleeve hem and decided the pattern length was to my liking. I topstitched the hems in place.
To tack the facing to the jacket I pinned it in place and stitched in the ditch from below the bustline curve to a few inches above the hem, and also at the forward shoulder seam a couple of inches.
I chose five beautiful etched horn buttons and made the buttonholes. I used my fusible tricot interfacing for the facings and found that it stabilized the buttonholes (and the jacket) sufficiently. In retrospect I may have made corded buttonholes just because they are so beautiful and really do stop any stretching of the buttonhole.
I decided that the fabric might be a bit heavy for the double collar, so I opted for the single collar. I did not interface the collar.
This jacket is instant gratification sewing. What I love about sewing is that I made something so nice in such a short amount of time with no complications. My patterns and fabrics are designed with that in mind. Sewing can and should be that way.

