
Sewing a drape-pocket tunic
Closet Inspiration
Alteration to Travel Trio Three #226 Raglan Tee

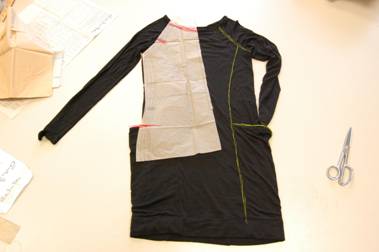
This top was inspired by one hanging right in Christine’s own closet. At a glance, it has raglan sleeves, princess seams, and pockets on the side that drape a little at the top. On closer inspection, the side panel is a unit that eliminates the side seam and provides the fit along the princess lines in front and back with added length in the bodice and sleeves, and a lower neckline. The Raglan Tee from the Travel Trio Three #226 envelope is what we used to create our look.
Wear this look with leggings, skinny jeans, bell bottoms, or as a cute mini-dress. Fabric pictured in the finished garment is ITY1029, a 9oz. ITY Knit, 60” wide, Rayon/Poly/Lycra, with 80% stretch.
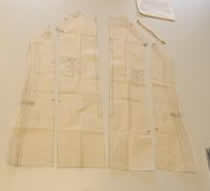
1. I laid the front pattern piece over the top I intended to copy and took note of the where I planned on starting the princess seam, how much lower the new neckline would be, the placement of the side pockets and also the amount of length to add to the bottom.
Pattern Drafting
2. Using a curved ruler, I drew in the princess seams on the front and back pattern pieces. Next, I added single notch markings in front and double notch markings in back to help line the new pieces. Remove the seam allowance that is provided in the side seams. Adding additional notches to the front, back, and sleeve pieces will be helpful since the princess seam will originate at the original underarm notches. Cut apart.

3. I went back to the original top and observed a slight a-line that flares in the side panel. The side panel also eliminates the traditional side seam. I measured the difference in width between the top of this panel at the underarm and the bottom at the hem.
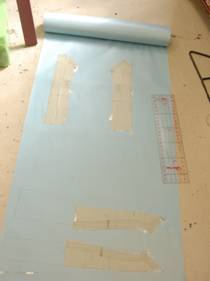
4. Tape the new pieces to paper.

5. a. Using a ruler, draw a straight line starting at the underarm on the side seam and ending at the determined desired length (plus hem allowance)

b. Add the desired flare to the princess seam on both sides of what will be the side panel. In the sample, I only added one inch. Use a ruler to draw in new design line that will start at zero point just below the curved line at the underarm and flare out an extra inch at the bottom (the princess seam on the center front and back remains straight).
c. Add seam allowance to the princess seams and length (I added 11 ¼ inches).
d. Add desired length to sleeve (I added 3 inches).
e. Cut new pattern pieces out following new cutting lines.
f. Combine the front and back side pieces by taping them together along the straight line at the underarm. The grain line of the side panel piece follows this straight line. True up the underarm seam line.
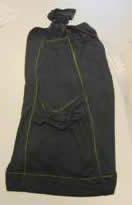
g. Create pocket pattern piece. The top of the pocket is finished by adding an extra 2 ½ inches to the total length at top of pattern piece that will be folded down. The pocket is a piece is a simple rectangle that is the same width of the side panel at its widest part at the bottom. The drape iscreated when it is sewn into the side panel that has the a-line taper.
h. In the sample, the neckline is dropped 1 ¼. Drop neckline on center front and back pieces and also the sleeve.
i. Measure the new neckline and make the new neckband pattern piece 1 to 2 inches shorter than the measurement (after center back seam allowance).
Layout and Cut
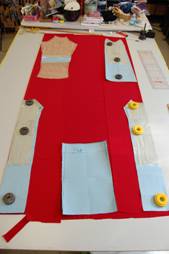
6. Layout and cut. I cut the center front, back and side panel pieces first then repositioned the fabric to get the sleeve and the pockets cut out. (2 yards).
Construction
7. Fold down and press the 2 ½ inches at top of pocket.

8. Baste the pockets onto the side panel pieces.
9. Using the notches as reference, construct the bodice.
10. Construct underarm seam of sleeve.
11. Attach the sleeve to the bodice aligning the notches.
12. Join the band at the center back seam. Fold and press the band in half then edge serge the raw seam.
13. Attach the neckband, stretching it to fit the neckline.

14. Hem the sleeves and bodice.
By Auria, Sample Garment Sewer @ CJ Studio